
Documents - Adding and Editing
There are several areas in Employee Self-Service Kiosk where you can add or view documents and images.
For example, in Employee Details | Personal Details, Expense Details | My Expenses, and in all Employee HR Details options.
In addition, in Employee Self-Service Kiosk OHS you can add documents to Incidents, Hazards, Plant and Audits.
Adding a Document
To add a document, either access the relevant document tab for items , such as Employee HR items or OHS items or through the Attachments button for Leave and Expense requests.
For details on adding Attachments refer to Leave Request options.
- In the Documents tab, click New. Add Multi functions the same as adding documents to Leave Requests.
The DocumentEdit screen will open. -
Click Browse to the right of the File field, and then Browse to find the file you wish to load.
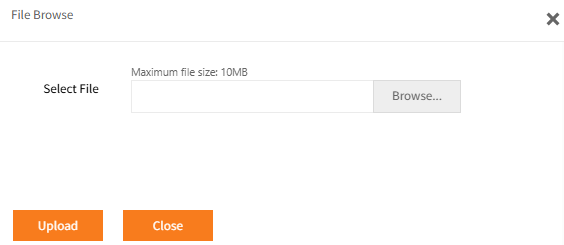
- Click Uplaod
- Complete the following information, as required.
When complete Click Save and OK on the confirmation message to load the file into the Ready Pay database and then Close.
When you add a document in Employee Self-Service Kiosk, this will Load a copy of the document into the database.
Therefore file sizes are an important consideration:
File Size
There is a default 10MB file size restriction when adding documents.
This can be increased in Ready Pay’s Settings screen – General > Document Store – max document size.
It is not recommended to increase this as 10MB is already rather large and each time a document is added this will increase the size of the database.
If many people are adding large documents, this could start to slow down the performance of Ready Pay and Employee Self-Service Kioskand may cause drive space issues.
Consider reducing the document size limit in Ready Pay if this could be a concern.
If users are scanning documents, instruct them to reduce dpi.
In most cases scanner default settings usually create much larger large file sizes than are necessary for readability.
We suggest that users are asked not to Loaddocuments unnecessarily.
They should consider if adding it via Employee Self-Service Kiosk is relevant, or whether another method of document sharing is more appropriate.
for example sending by email or saving in relevant shared areas in a network.
Alternatively, for Ready Pay users not using Ready Pay cloud , documents added in Ready Pay rather than Employee Self-Service Kiosk may be Attached instead of Loaded.
Allthough attached documents may be made available to Employee Self-Service Kiosk by ticking that checkbox on the Publish tab in Ready Pay, it may not be accessible, as the file location likely not be accessible by Employee Self-Service Kiosk.
Accordingly, it is recommend to Load if a document is to be made visible to Employee Self-Service Kiosk.
When a document/image is loaded in Employee Self-Service Kiosk, the Employee Self-Service Kiosk Publishoption is activated automatically.
Editing
To edit a document's details, click the Edit icon in the Action column or select the document record and click the Edit button.

Make any changes to the document’s Details or User Defined Fields tabs as required and Save, OK and Close.
To access the document itself for editing, click the Open hyperlink in the File column.
Depending on browser configuration and the document type it may open in a new tab or may download onto your device.
If making changes and these changes are to be reflected in the original document, you need to consider where the original document is located.
We suggest the following processes for updating the document:
- If it is in a network location and you don't have access to this, you may choose to Save the Employee Self-Service Kiosk copy to a local location (e.g. your Desktop) and make the changes.
When you then have access to the network, replace the original document with this updated version.
Note that you should also adhere to any document control processes in place in your organisation. - Alternatively, Save the file with the same name and in the same location as the original (i.e. to overwrite it) and make the changes.
- It may be it only needs to be stored in the Ready Pay database and therefore do not need to retain it elsewhere after it is uploaded into the database through Employee Self-Service Kiosk.
Whichever method you choose, once you have updated the document, this version should be Loaded into the database.
In Employee Self-Service Kiosk, click the Edit icon or select the entry in the Documents tab and click the Edit button.
Click Browse and locate the updated version of the document.
Click Upload. Then Save , OK and Close.
This will retain all the original details, such as Document ID, but will update the Modified date.
Document Store
This option links to the documents/images that have previously been stored within the Ready Pay
this allows you to search for documents/images to Link or Load into an item in Employee Self-Service Kiosk..
However, it will only provide access to those documents/images for which the Document Store AND Employee Self-Service Kiosk options have been selected.
These options are located on the